 GitBucket
|
|
|||
|---|---|---|---|
| docs | 4 years ago | ||
| README.md | 4 years ago | ||
README.md
工场网 V2.0
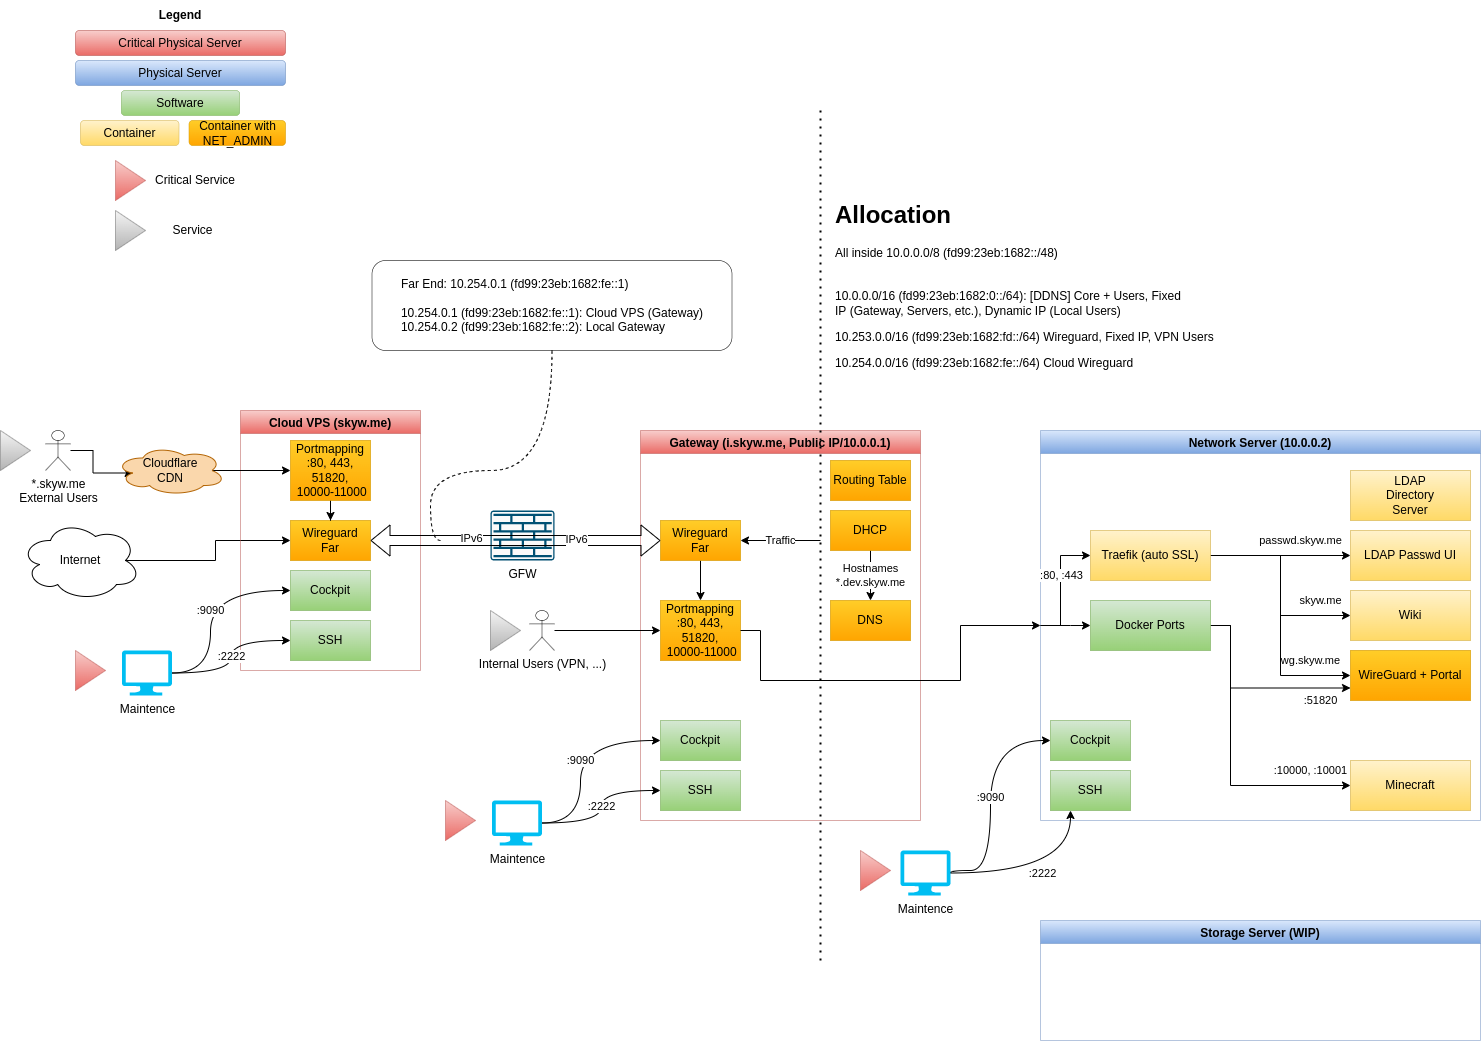
架构
服务列表
域名
Cloudflare (DNS, CDN)
Cloud VPS
Gateway Server
Network Server
服务器 Setup
建议安装 Debian latest (>= 10)
Enter root (if not)
(All repo files is placed under /root)
sudo -i
Verify SSH key (optional)
ssh-keygen -lf /etc/ssh/ssh_host_ecdsa_key
Generate GPG key without passphrase
apt install -y gpg
gpg --batch --passphrase '' --quick-gen-key <SERVER_EMAIL_ADDRESS>
Add GPG key to ssh
gpg -K --with-keygrip
echo <GPG_PUBLIC_KEY_SHOWN_ABOVE> >> ~/.gnupg/sshcontrol
Enable GPG ssh support
echo "enable-ssh-support" >> ~/.gnupg/gpg-agent.conf
echo "export SSH_AUTH_SOCK=$(gpgconf --list-dirs agent-ssh-socket)" >> ~/.bashrc
echo "gpgconf --launch gpg-agent" >> ~/.bashrc
. ~/.bashrc
(On development PC) Tell this key the secrets on repo
To view GPG key:
gpg --armor --export <SERVER_EMAIL_ADDRESS>
(On github) Add this key to server code repo's deploy SSH keys
To view SSH key:
ssh-add -L
Setup networking
Put /etc/network/interfaces with server-specific interface configuration
nano /etc/network/interfaces
Clone server repo
cd ~
apt install -y git
git clone --recursive [email protected]:skyw-me/skynet-server-<SERVER_NAME>.git
Server automatic setup
WARNING: this script will reboot when finished
./public/setup-debian.sh
Start services
Services will automatic startup, by using docker restart option
cd skynet-server-<SERVER_NAME>
./public/deploy.sh
网络设置
Cloud
# This file describes the network interfaces available on your system
# and how to activate them. For more information, see interfaces(5).

source /etc/network/interfaces.d/*

# The loopback network interface
auto lo
iface lo inet loopback

# The primary network interface
auto eth0
iface eth0 inet manual

auto eth1
iface eth1 inet manual

# Web connection
auto br-web
iface br-web inet static
  bridge_ports eth1
  bridge_stp off

  address 104.149.164.34
  netmask 255.255.255.252
  gateway 104.149.164.33

  dns-nameservers 1.1.1.1

iface br-web inet6 static
  address 2604:6600:0:48::2/64
  gateway 2604:6600:0:48::1
Gateway
# This file describes the network interfaces available on your system
# and how to activate them. For more information, see interfaces(5).

source /etc/network/interfaces.d/*

# The loopback network interface
auto lo
iface lo inet loopback

# Primary: eno1 VLAN Trunk
auto eno1
iface eno1 inet manual

# VLAN3: WAN
auto br-wan
iface br-wan inet static
    bridge_ports eno1.3
    bridge_stp off

    bridge_hw ac:cb:51:ef:ed:cc
    address 166.111.17.67
    netmask 255.255.255.192
    gateway 166.111.17.65

    dns-nameservers 1.1.1.1

# ipv6 dhcp is unstable...
#iface br-wan inet6 dhcp
#    dns-nameservers 2606:4700:4700::1111

# use isatap for ipv6
auto br-wan-ipv6
iface br-wan-ipv6 inet6 static
    address 2402:f000:1:1501:200:5efe:166.111.17.67
    netmask 64
    gateway fe80::200:5efe:166.111.21.1

    pre-up ip tunnel add $IFACE mode isatap remote any local 166.111.17.67
    pre-up ip tunnel prl dev $IFACE prl-default 166.111.21.1

# VLAN100: LAN
auto br-lan
iface br-lan inet static
    bridge_ports eno1.100
    bridge_stp off

    bridge_hw 00:81:33:a9:d0:02

    address 10.0.0.1
    netmask 255.255.0.0

iface br-lan inet6 static
    address fd99:23eb:1682::1/64

# Optional
# VLAN4: Compatibility Layer for /24 Devices
auto br-compatdev
iface br-compatdev inet static
    bridge_ports eno1.4
    bridge_stp off

    bridge_hw 8f:5e:21:bc:9c:0b

    address 10.3.0.1
    netmask 255.255.255.0

    # DNAT & allow established connections
    post-up iptables -t nat -A POSTROUTING -o $IFACE -j MASQUERADE
    post-up iptables -A FORWARD -i $IFACE -m conntrack --ctstate ESTABLISHED,RELATED -j ACCEPT
    # remove rules
    post-down iptables -t nat -D POSTROUTING -o $IFACE -j MASQUERADE
    post-down iptables -D FORWARD -i $IFACE -m conntrack --ctstate ESTABLISHED,RELATED -j ACCEPT
域名
[TODO]